

Results 1 to 10 of 29
-
20 December 2015 #1Saab Enthusiast


- Join Date
- 18 Nov 2014
- Location
- Medina, OH
- Posts
- 113
- Saab(s)
- '04 9-5 Aero Wagon, '90 900
2003 Linear Sedan Project
I've dropped a few hints about this project here and there, so I figure it's about time to get a thread going about it. If nothing else, it may provide some sideshow entertainment. Hopefully we end up with a running, driving car at the end
 . I also have a thread up on GRM if anyone goes to that site. This one will be different in that there will be more Saab specific content to go along with the comedy of errors. My goal is to get a running, driving, bulletproof car for less than $2016, in keeping with the GRM $2016 Challenge rules. We'll see...
I saw this on the local CL, located about 10 minutes from me. The original engine sludged out and spun a rod bearing. The PO had bought a second engine to swap in, but that one turned out to have a balance chain guide failure and was making metal to metal contact. He had a bunch of other projects going, so he decided to dump this one on the first unsuspecting Saab guy to come along.
So, cliff notes version: 03 9-5, ~135k, two dead engines from different causes, neither of which is currently in the car. What could possibly go wrong?

The PO was kind enough to drag the car over to my house on his tow dolly, while we loaded up long blocks and miscellaneous parts in the family truckster and trailer. Saved us a couple hours, and we got everything packed away before the snow/rain mix arrived.
Here's what two engines worth of internals and ancillaries looks like in the back of an Odyssey:

Long blocks, human engine hoist, and car in background:

And everything offloaded into the garage. Sadly, my C900 project, was bumped down the list, and has moved outside for the winter . Sad, but no budget for a big enough garage to keep everything inside.

I borrowed a hoist from a buddy, and got engine #1 up on the stand. I got the 1000lb HF stand using the 20% off coupon.
A week or so later, after finishing the Aero Wagon project, my son had a few other linemen come over to push dead cars around. Then they started a dead lift tournament of blocks, complete long blocks, the hoist, etc. When that got boring, they went inside and ate all the food in the house in roughly 27 seconds .
.
Current parking situation:

The third bay is the work area. I'll need to spin the car sideways when we go to drop the new engine in place.
So with the car in place, here's the rough project plan:
- Create a workable engine from these two. They both failed in different ways, so there should be enough parts to create one good one. The car came with a new balance chain set, undersized rod and main bearings, new water pump, almost new (Garrett ) turbo with no end play, and one of the cranks had been turned down already.
- Do some underhood maintenance things that are nightmarish with the engine in place, or just easier without it in the way.
- Subframe bushings
- Coolant bypass - it's just sitting there out in the open right now!
- Alternator, hopefully just the VR
- Serpentine pulleys - I think we can have them all in place when the engine goes back in, and save a few hours of aggravation
- Rad hoses
- CV boots
- Cosmetic detailing. The body is rust-free, but had been sitting outside under pine trees for awhile. Also, looks like someone used a scotchbrite pad to clean it at some point, so I have an excuse to get a buffer. Interior is in very good shape overall, just dirty.
Let the adventure begin!
-
20 December 2015 #2Saab Enthusiast
- Join Date
- 18 Nov 2014
- Location
- Medina, OH
- Posts
- 113
- Saab(s)
- '04 9-5 Aero Wagon, '90 900
#2
Teardown of engine #1. This is the one with the spun rod bearing.


Note to self: remove back cover from block before putting it on the stand. Crank is not removable this way. Live and learn...

Bores looked OK. I can still see crosshatching; there is a bit of scuffing at mid-bore on all 4 cylinders, and a bit of a carbon ridge.

Now for the exciting part:


The crank from engine #2 is on top in this pic.

My amateur opinion is that crank #1 is trashed. The scratches and metal transfer from the bearings are pretty deep.
-
20 December 2015 #3Saab Enthusiast
- Join Date
- 18 Nov 2014
- Location
- Medina, OH
- Posts
- 113
- Saab(s)
- '04 9-5 Aero Wagon, '90 900
Going out of chronological order so this makes a bit more sense. I got engine #2 apart last night. It looked better on the outside, and came with a Mann oil filter still attached. I was hoping it was in better shape inside. Not so sure anymore.
The piston tops and combustion chambers had tons of this soft carbon on them. Most of it wiped away with a rag. I'm not sure if I should freak out about the petrified Dexcool in the cooling jacket or not.


On the plus side, the bores look about the same as the other block, with the same light scuffing on the sides from piston skirts. This one has less of a ridge at the bore tops than block #1, though.
-
21 December 2015 #4Saab Enthusiast
- Join Date
- 18 Nov 2014
- Location
- Medina, OH
- Posts
- 113
- Saab(s)
- '04 9-5 Aero Wagon, '90 900
OK one more post today on the appearance/cosmetics front. The car had been sitting out under pine trees for, well, awhile. I really, really hate pine trees! When I was a kid we had them all over the yard, and I'd end up covered in sap from climbing around. Most of that sap seems to have ended up on this car as a karma payback for torturing my mom with sap-saturated clothes over a period of years.
I used almost a gallon of Purple Power, lots of Pre, and some brake cleaner. Flushed about 30lb of pine needles out of everywhere.
I pulled the front bumper partly because it had been banged into something and will need some repair, partly to give a bit more room in front of the car, partly to get the lights out so they don't get banged up. The hood will also be coming off at some point.

Other fun stuff. One warm day, I started working on the paint. Started with 2000 grit sandpaper on a block, then rubbing compound, then polishing compound.
Before:

After:

Other than the fact that it changes from day to night, not much difference in appearance . I'll be working on it more with power tools in the future. The trunk lid actually looks a lot better, though.
I also did some clean up on engine ancillaries and brackets. Blasted everything, painted the steel with VHT Ford Grey paint. I'll do the lifting eyes in powder coat on a day when there's no one else home to complain about the smell of baking powder. I have an old oven in the basement, but even with an exhaust fan rigged up, it's still noticeable.

Before / after comparison of coolant tubes is much more rewarding than the bodywork:

And to top it off, did a bit of baking. The other other white meat:

Actually this was the test set for the blue saddle bracket and valve cover for the Aero wagon. The blue ones came out better, but this still looks much better than flaking black or pitted bare aluminium.

A bit cart before horse, but it's cool to have nice wrinkle painted stuff as encouragement.
And today's mini-project. Headlight clean-up. I still need to replace the low beam connectors. I think this car had DRLs enabled, and it looks like things got a bit warm inside the low beam housing area over time.

-
22 December 2015 #5Saab Enthusiast
- Join Date
- 18 Nov 2014
- Location
- Medina, OH
- Posts
- 113
- Saab(s)
- '04 9-5 Aero Wagon, '90 900
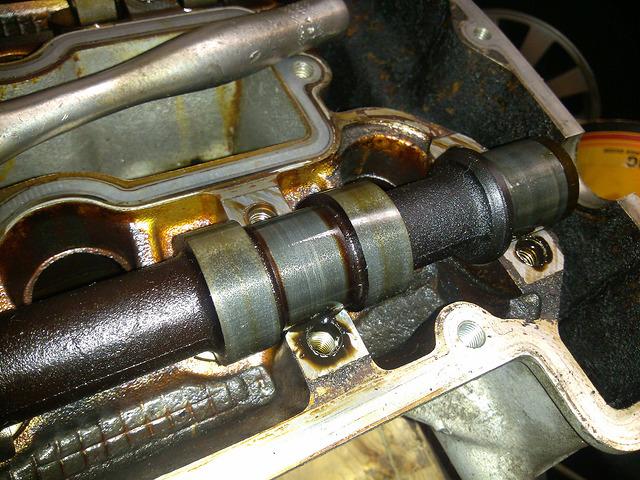
Did some teardown on the heads yesterday.
I started off with #2, which was the engine with the balance chain guide failure. I'm thinking some shrapnel got up into the cam bearing journals .
.

With the caps off:

Caps, and the bolt closest to the plugs. I just thought it was a neat detail that they cut a channel through the bolt for oil flow. It also points out how critical good oil is, because there's not much space. Bearing cap doesn't look so good.

The bearing caps. Check out the upper left cap. That's not lint in the middle of the bearing .

And this is the corresponding journal, #4 exhaust.

I think we're done here .
.
On to head #1, which is the engine with the spun rod bearing.
Bearing caps off. Yes, I'm using a stack of Civic tires as a work bench for this one. Don't judge me.

Representative exhaust journal (#1)

And the #1 intake journal:
Still some scoring, but I can't snag a nail on any of these scratches.
I pulled out the lifters with a magnet, and put them into numbered wells so they stay matched to the correct valve. Soaking in oil so they stay sort of pumped up.


I also started pulling out valves. Shown is my highly developed 7/8 socket with a cutout in the wall and wrapped with electrical tape, which I use along with my '80s vintage Craftsman valve compressor. These valve keepers are tiny compared to the Honda and Dodge ones I saw last time I took a head apart. Should be fun to get them back in place.
I'll replace the valve seals, lap the valves, get it hot tanked and checked for square.
-
22 December 2015 #6
Frank Administrator
- Join Date
- 30 Jul 2010
- Location
- USA - Netherlands
- Posts
- 7,901
- Saab(s)
- previous: 2006 9-3, 2001-06 9-5, 2011 9-4X
I am following your project with great interest and admire your skills in bring this Saab back to life. That Dexcool residue seems a bit scary so definitely a good idea to regularly change the coolant in any 2.3 engine. And your pictures show that good oil and frequent changes are always important.
-
22 December 2015 #7Saab Enthusiast
- Join Date
- 19 Jul 2015
- Location
- Charlottesville, VA
- Posts
- 218
- Saab(s)
- 1997 NG 900 SE
The journals look like the oil pressure was low. Might want to check oil pump and circulatory system.
Love your work bench and "custom" valve spring compression tool. Used to have a similar one myself.
Sent from my C6725 using Tapatalk
-
23 December 2015 #8Saab Enthusiast
- Join Date
- 18 Nov 2014
- Location
- Medina, OH
- Posts
- 113
- Saab(s)
- '04 9-5 Aero Wagon, '90 900
Thanks for the support!
Wulf, I heard somewhere that Dexcool is ok by it self, but does not play well with others. It's possible that someone may have added some green stuff without thinking about it. I put G-05 in the other car, and have more to put in this one when I get to that point.
Southsaab, I actually have two benches, but with the sheer volume of 'stuff' involved, I run out of flat spaces to put things and work on them. I brought up a folding table to organize things, and ended up using the top of the parts washer for one head, tire stack for the other. Gotta get creative.
I'm planning to get a new oil pump as part of the rebuild, cheap insurance. I think the low oil pressure was more a matter of sludge than oil pump output based on what we'll see in a bit.
Today I was off work and got the head disassembled the rest of the way.
To get the valve seals out, the Haynes manual says to simply grab the seal with a pair of pliers. Not so much.
Fortunately, there's a small relief in the head under the spring seat part of the seal to allow you to get a right angle probe in.
You can also see the sludge around the cap bolt hole where the oil supply comes up to the cap in the bottom left of the picture.

I started off with two probes, wrapped in electrical tape so I didn't scratch the bores for the lifters. I realized that most of what is holding them in place is suction from oil that's accumulated underneath the seal.
I made my own ghetto seal remover tool using needlenose visegrips and the finger of a rubber glove .
.

Don't judge me, it worked and I didn't damage anything...Actually the vise grips were the best serrated jaws I had for grabbing the seals. I ended up using the pliers to twist and pull up on the seal enough to get the probe underneath to break the vacuum and pop it off.
I found this in the 'hangar deck' of the head. No clue what it's from. Copper, too big to be from a valve seat.

Bare head, almost. But what's that, there's a broken stud. No problemo.

$8 left hand drill set from HF. Well worth the money. Suitably labelled so my son doesn't grab them and try to use them like regular drills.

Three minutes later, Great Success:

(Those drills with the $28 HF close quarters drill work great for drilling out broken studs in the car as well, by the way.)
And here it is ready to visit the machine shop.

-
23 December 2015 #9Saab Enthusiast
- Join Date
- 19 Jul 2015
- Location
- Charlottesville, VA
- Posts
- 218
- Saab(s)
- 1997 NG 900 SE
Like your vice grip accessory. Yeah, something definitely impeded oil supply, just mentioned oil pump as that's what it's first suspected, except with sludge Saabs. Got that much scoring on the journals there must have been next to nothing flowing. Probably ran a bit hot, too, with no oil flow.
At this point, are you going to regrind the crank journals and reuse the crankshaft, going for the full rebuild?
Sent from my C6725 using Tapatalk
-
23 December 2015 #10Saab Enthusiast
- Join Date
- 18 Nov 2014
- Location
- Medina, OH
- Posts
- 113
- Saab(s)
- '04 9-5 Aero Wagon, '90 900
I actually have in the pile of stuff a crank which has allegedly been turned down 0.25mm, along with a set of undersize main and rod journals. I'll need to measure to verify that, but the journals on that crank look nice and clean. (Scroll up to the last pic of my first post. )
A buddy is going to give me a hand assessing the best combination of parts and getting everything measured properly.


 Reply With Quote
